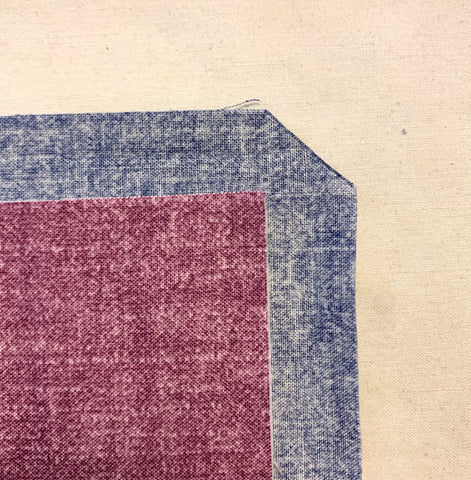
How to Make Mitered Corners on Quilt Binding
One of the last step of making a quilt is putting on the binding. I know that sometimes, after I have spent a lot of time working on a quilt, I am anxious to get it done. It is such a temptation to do a quick job just to have it done. But after there has been so much time put into a quilt, it is important to finish it nice so that the WHOLE quilt can be awesome.
One way to have a really nice binding is to have mitered corners.
Don't know what a mitered corner is? Think of it like an envelope closure for the corners. Here are a few examples.
There are two ways, that I use, to make mitered corners.
I refer to them as the Official way and the Simple way.
For the official way, I start with my fabric all laid out. This method is hard to do while the quilt is in the machine.
For this example I am using the binding method where I use the backing fabric as the binding.


Clip off about half to a third of the corner. This helps reduce bulk in the corner and helps it lay flat.

If you have a raw edge, fold the edges over to create a clean edge.

Next, fold the corner into the quilt. The fold needs to just meet the corner of the top fabric. If the fabric of the quilt top is folded then the fold is too far into the quilt.

Then, fold in each side.
Here is the first side.

And the second side.

You know you have done it correctly if the corner is sharp, the folds on the quilt top line up, and the diagonal edges on the mitered corner don't overlap too much. This one is not perfect, but it is close enough for me.
For the Simple way of making a mitered corner, we go back to this point. Clip off the bulk in the corner. This method can be done while the quilt is already being stitched, if you are a fold and stitch type of person that doesn't like to pin.

Fold the first edge over to cover the raw edge.

Next, fold the same edge over. This will cover the edge of the quilt top.

Next, fold the corner over. Notice the triangle that is created, the bottom edge of the triangle is even with the edge of the quilt top.

Fold the next raw edge over to meet the quilt top.

Last, fold the same edge over to cover the edge of the quilt top. The corners should be sharp and the edges should meet up correctly.

Now pin it down and stitch it in place.

Congrats on getting close to finishing the quilt! Finish strong!
Have fun quilting!


Hi Debbie!
I don’t have a tutorial for that. There are people that can pin it on and sew it all on in one line of stitching, but I have not yet mastered that. So I use the same method for the single fold and the double fold. I hop eyou can find what you are looking for!
https://www.bobbininquilts.com/blogs/news/mitered-corners-on-a-quilt-binding-part-2
Do you have a tutorial or making mitered corners on a quilt using double fold bias tape?
Thank you so much for this! I was having problems trying to add binding to some potholders I was making using the binding strips and vaguely remembered there was a way to use the same back fabric without using the strips. I used the simple method and it was so much easier. This will be my go-to method from now :)
Hi Donna!
Thanks for asking! You will not need to trim it back. Check out this link https://www.bobbininquilts.com/blogs/news/mitered-corners-on-a-quilt-binding-part-2
It will show you how to do the mitered corners when the top, back and batting are are all trimmed the same.
I am doing quite ing as u go for the first time mitering corners, I have batting and the back all the way to the edges. Do I cut the batting away before mitering the corners.